In questo articolo, esploreremo una ricetta deliziosa e facile da preparare.
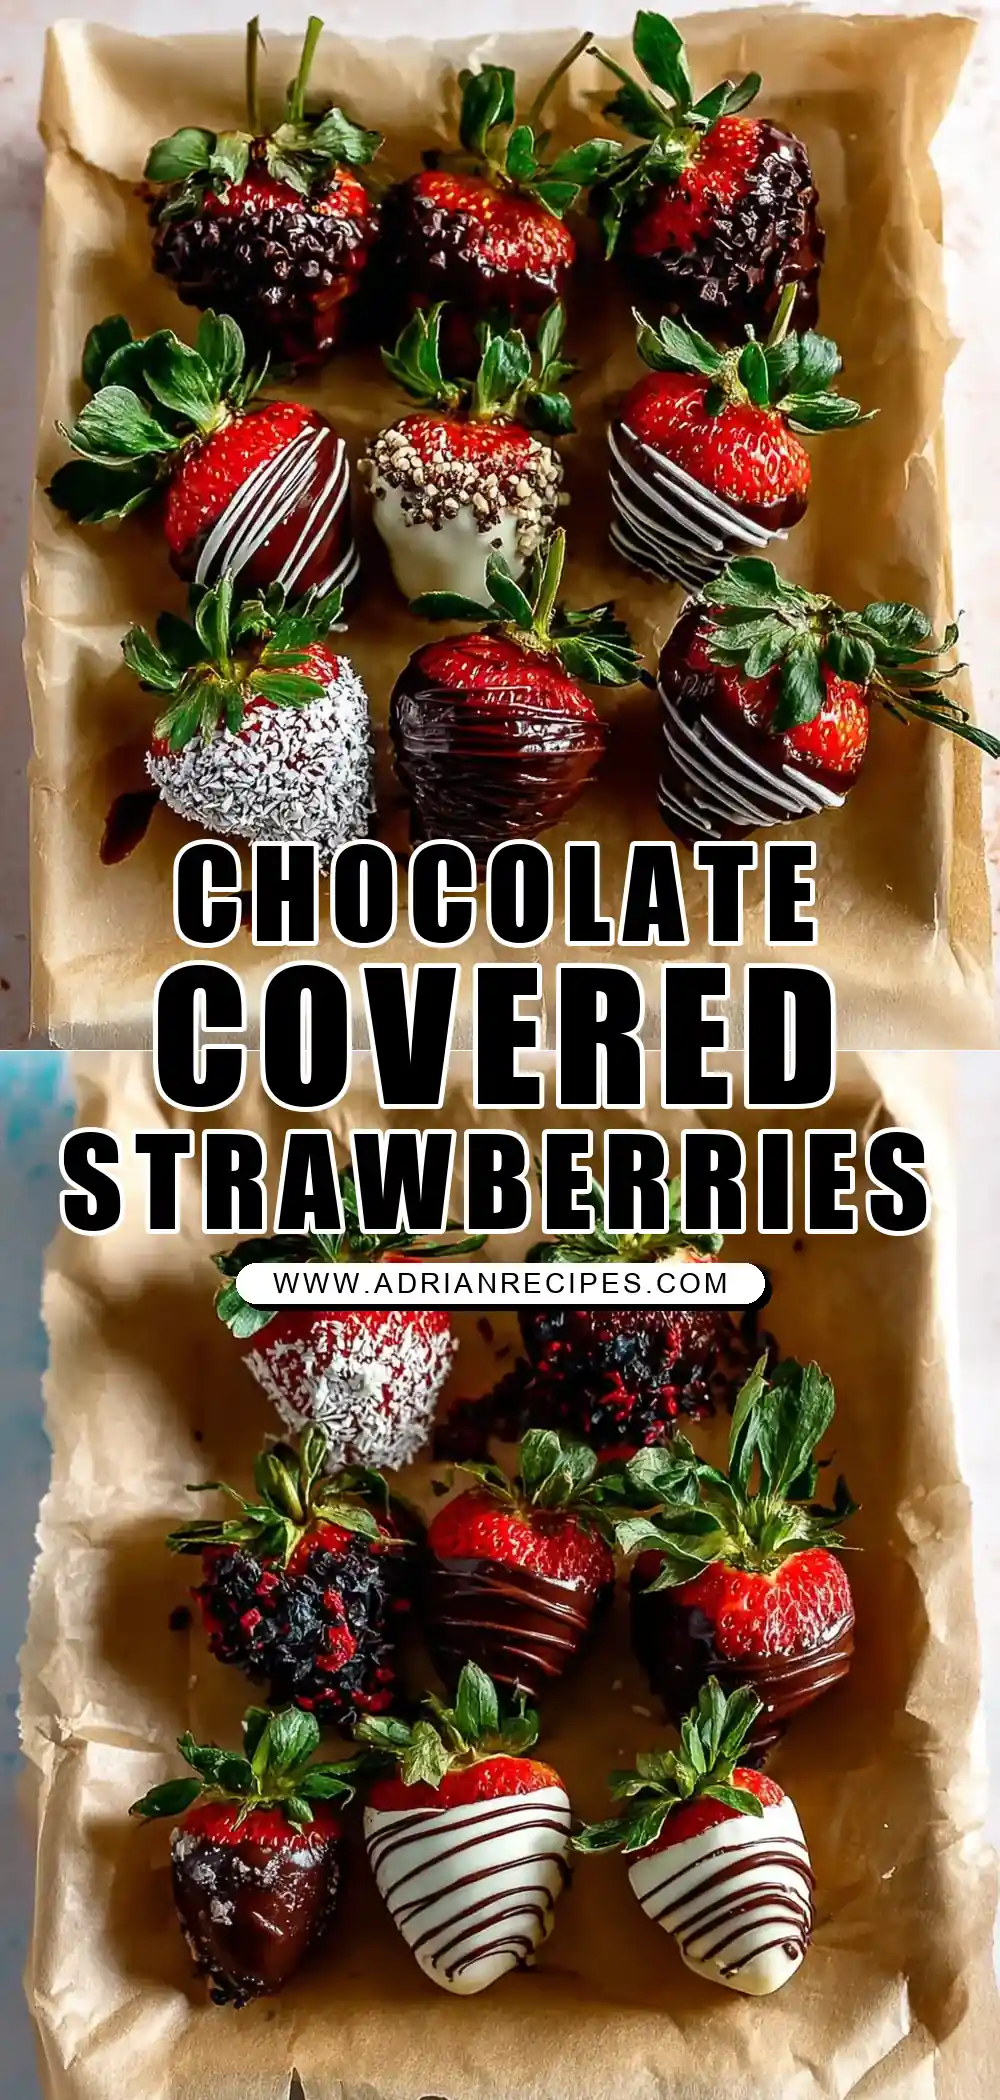
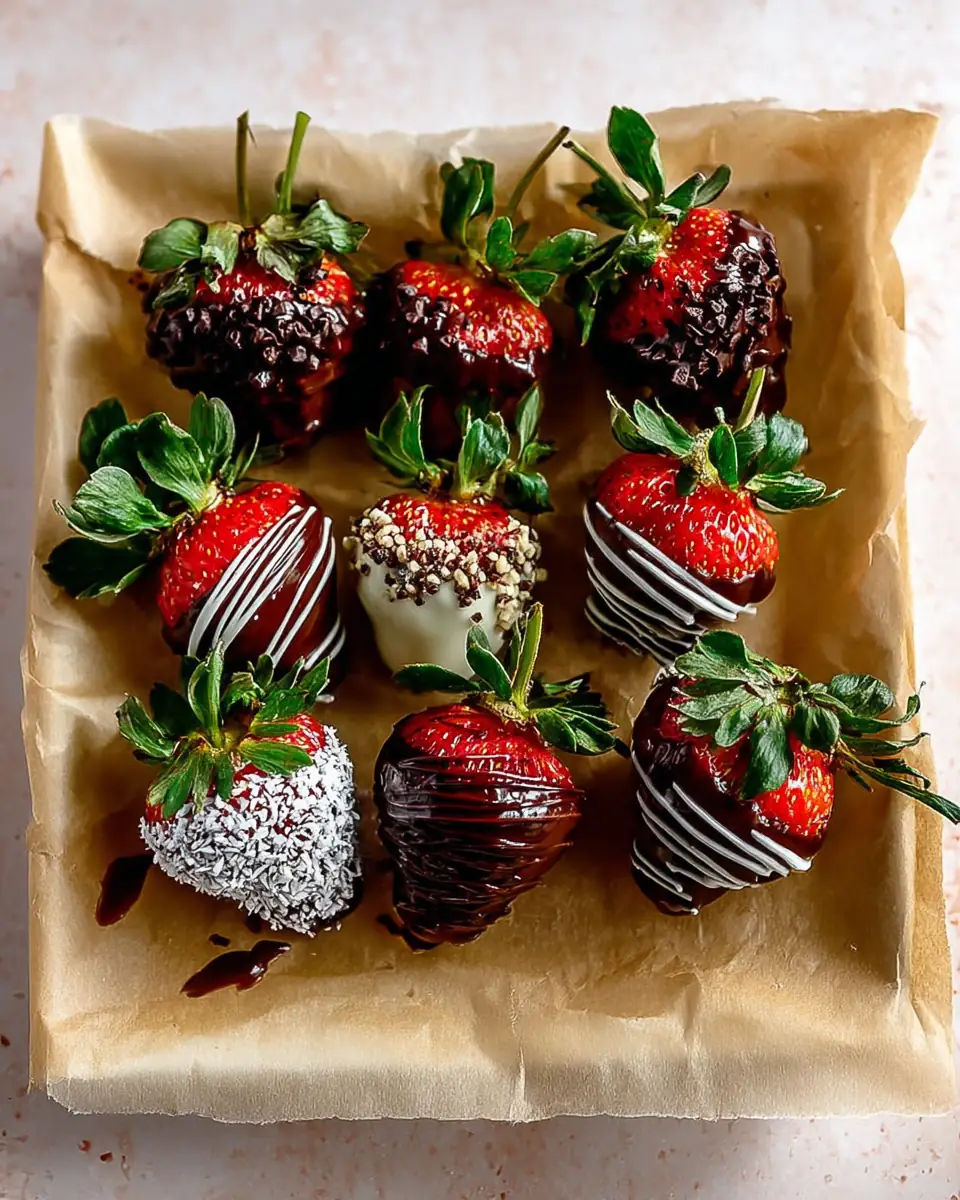
Chocolate Covered Strawberries
Craving a sweet, elegant treat that’s surprisingly simple to make at home? Look no further than classic Chocolate Covered Strawberries! These delightful morsels, combining the juicy freshness of ripe strawberries with the rich indulgence of melted chocolate, are a universal favorite. Whether you’re preparing for a romantic evening, a festive gathering, or simply want to treat yourself to a gourmet dessert, homemade chocolate covered strawberries are always a perfect choice. Forget store-bought versions; making them yourself ensures peak freshness, customizable flavors, and an incredibly satisfying experience. Let’s dive into creating these irresistible dipped strawberries that will impress everyone.
Ingredients List
To create your perfect batch of Chocolate Covered Strawberries, you’ll need just a few high-quality ingredients. The key to success lies in fresh produce and good chocolate!
- 16 oz fresh strawberries
- 10 oz chocolate chips or chopped chocolate (semi-sweet, milk, or dark chocolate – your preference!)
- 1 tablespoon coconut oil, optional (for a silkier, softer chocolate coating)
- Optional toppings: chopped nuts, shredded coconut, toffee bits, mini chocolate chips, crushed Oreos, festive sprinkles, or melted white chocolate/extra chocolate for drizzling
Timing
Making these delectable chocolate dipped strawberries is quicker than you might think, especially with our streamlined process.
Prep Time: 15 minutes
Drying Time: 30-60 minutes (essential for best results)
Active Dipping Time: 15-20 minutes
Chill/Set Time: 10-60 minutes
Total Time: Approximately 1 hour 10 minutes to 2 hours 35 minutes (depending on drying and setting method)
Step-by-Step Instructions
Creating beautiful, professional-looking chocolate covered strawberries is incredibly easy when you follow these simple steps. Precision and a little patience are your best friends here!
Prepare Your Strawberries for Dipping
First things first, let’s get those strawberries ready. Wash your fresh strawberries thoroughly under cool water. Place them on a clean kitchen towel and gently dry each one individually with a paper towel. This step is absolutely crucial – any moisture on the strawberries will cause your chocolate to seize or not adhere properly. Let them air dry on the towel for at least 30 minutes to an hour, ensuring they are completely, utterly dry. It’s best to dip room temperature strawberries for the smoothest finish.
Line Your Baking Sheet
While your strawberries are air-drying, prepare your work surface. Line a large baking sheet with parchment paper or wax paper. This will provide a non-stick surface for your dipped strawberries to set without sticking, making for easy removal. Set this aside.
Melt Your Chocolate Perfectly
Now for the star of the show: the chocolate! Put your chosen chocolate chips or chopped chocolate into a microwave-safe bowl. Microwave in 20-second intervals, stirring well after each interval, until the chocolate is completely melted and beautifully smooth. This usually takes about a minute, but microwave times can vary, so keep a close eye on it to prevent overheating. Overheated chocolate can become grainy or seize. If you desire a slightly softer, more pliable chocolate coating, melt the optional tablespoon of coconut oil along with your chocolate.
- Pro Tip for Melting: If you prefer a double boiler method, bring about an inch of water to a simmer in a saucepan. Place a metal bowl over the saucepan, ensuring the bottom of the bowl does not touch the simmering water. Add your chocolate and stir occasionally until melted and smooth. This method provides gentle, even heat.
Dip Your Strawberries with Care
Hold each strawberry by its green leaves (the stem provides a natural handle!). Slowly and gracefully dip the fruit into the melted chocolate, covering the berry almost entirely, leaving just a peek of red or the green leaves visible for contrast. Lift the strawberry and gently shake off any excess chocolate back into the bowl. This ensures a clean, even coating without thick puddles.
Add Your Favorite Toppings (Optional)
If you’re adding any delightful toppings like chopped nuts, shredded coconut, or toffee bits, now is the time to do it! Immediately after dipping and before the chocolate sets, gently roll or sprinkle the strawberry with your chosen topping. Then, carefully place it onto your prepared parchment-lined baking sheet.
Drizzle for an Extra Touch (Optional)
For an artistic flair, consider drizzling your chocolate covered strawberries with contrasting melted white chocolate or even more of your main chocolate. Once your dipped strawberries are on the parchment paper, dip a fork into the melted white chocolate or extra chocolate and drizzle it decoratively over the berries. This adds both visual appeal and an extra layer of flavor.
Let Them Set and Enjoy!
Repeat the dipping process with all your remaining strawberries. Once all your chocolate dipped strawberries are arranged on the baking sheet, let them sit at room temperature for about one hour, allowing the chocolate to firm up naturally. If you’re in a hurry, you can speed up the process by placing the baking sheet in the refrigerator for 5 to 10 minutes, or until the chocolate is completely firm. Once set, remove from the fridge and serve at room temperature for the best flavor and texture.
Nutritional Information
Enjoying a delicious treat doesn’t mean sacrificing awareness. Here’s the estimated nutritional breakdown for one serving of these delightful chocolate covered strawberries:
- Calories: 159kcal
- Carbohydrates: 15g
- Protein: 2g
- Fat: 10g
- Saturated Fat: 6g
- Trans Fat: 1g
- Cholesterol: 1mg
- Sodium: 3mg
- Potassium: 192mg
- Fiber: 3g
- Sugar: 11g
- Vitamin A: 16IU
- Vitamin C: 22mg
- Calcium: 21mg
- Iron: 2mg
Please note: Nutritional values are estimates and can vary based on specific ingredient brands and portion sizes. The addition of toppings will also alter these values.
Healthier Alternatives for the Recipe

Looking to make your chocolate covered strawberries a little lighter or cater to specific dietary needs? Here are some fantastic alternatives:
- Opt for Dark Chocolate: Choose dark chocolate with a higher cocoa percentage (70% or more) for less sugar and more antioxidants. It offers a more intense flavor profile that pairs wonderfully with sweet strawberries.
- Sugar-Free Chocolate: For those managing sugar intake, sugar-free chocolate chips are a great substitute. Just ensure they melt smoothly.
- Coconut Oil for Gloss & Health: The optional coconut oil not only creates a smoother, softer chocolate but also adds healthy fats. You can even increase it slightly if you want a thinner coating.
- Natural Toppings: Stick to natural toppings like finely chopped nuts (almonds, pistachios) for healthy fats and protein, or unsweetened shredded coconut.
- Yogurt Dip (Alternative Treat): While not true chocolate covered, a Greek yogurt dip sweetened with a touch of honey and flavored with vanilla or cocoa powder can be a delicious, protein-rich alternative for dipping strawberries.
Serving Suggestions
Chocolate Covered Strawberries are incredibly versatile and perfect for almost any occasion. Here are some ideas to inspire your next gathering or personal indulgence:
- Romantic Evenings: A classic for Valentine’s Day, anniversaries, or any date night. Serve alongside a glass of champagne or sparkling rosé.
- Dessert Platter: Elevate your dessert spread by arranging them artfully on a platter with other small treats like macarons, mini cheesecakes, or fresh berries.
- Brunch Addition: Add a touch of elegance to your brunch buffet. They pair beautifully with pancakes, waffles, or a fruit salad.
- Gifts: Package them in a beautiful box with tissue paper for a thoughtful, homemade gift.
- After-Dinner Treat: A perfect light yet satisfying end to any meal, especially after a rich dinner.
- Alongside Coffee or Tea: A delightful accompaniment to your afternoon coffee or evening tea.
Common Mistakes to Avoid
Even though making chocolate covered strawberries is simple, a few common pitfalls can hinder perfection. Steer clear of these to ensure your success:
- Wet Strawberries: This is the #1 culprit for failed chocolate coating. Moisture causes chocolate to seize, creating a clumpy, unworkable mess. Always ensure your strawberries are completely dry.
- Overheating Chocolate: Microwaving chocolate for too long or at too high a power can burn it, making it grainy, thick, and unusable. Melt in short intervals, stirring frequently.
- Using Cold Strawberries: Dipping cold strawberries can cause the chocolate to set too quickly, resulting in a thick, uneven coating or even cracking. Room temperature strawberries allow for a smoother, thinner chocolate layer.
- Not Shaking Off Excess Chocolate: Too much chocolate clinging to the berry will create a heavy, thick coating and can lead to pooling at the bottom. A gentle shake ensures a delicate, even layer.
- Skipping Quality Chocolate: While any chocolate will melt, using good quality chocolate chips or baking bars will significantly improve the taste and texture of your finished product.
Storing Tips for the Recipe
While chocolate dipped strawberries are undeniably best enjoyed the day they are made, you can certainly store them to savor a little longer.
- Refrigeration: Store them in an airtight container in the refrigerator for up to 48 hours. Layer them gently, separated by parchment paper if stacking, to prevent sticking and bruising.
- Serving Temperature: For the best flavor and texture, remove them from the refrigerator about 15-20 minutes before serving to allow them to come closer to room temperature. This enhances the strawberry’s juiciness and the chocolate’s melt-in-your-mouth quality.
Conclusion
There you have it – the ultimate guide to crafting exquisite Chocolate Covered Strawberries right in your own kitchen! This timeless treat, blending the vibrant sweetness of fresh fruit with the luxurious taste of chocolate, is a testament to simple elegance. From selecting the perfect berries to mastering the art of the dip, you now have all the insights and tips to create a truly memorable dessert.
Whether you’re celebrating a special occasion, indulging a craving, or simply exploring your culinary creativity, these homemade chocolate covered strawberries are guaranteed to bring joy. Don’t hesitate to experiment with different chocolate types and a variety of toppings to personalize your batch. Share your creations with loved ones, or keep them all to yourself – we won’t tell!
Ready for more delightful dessert ideas? Explore our other sweet recipes like our Easy Chocolate Lava Cakes or perhaps a refreshing Fruit Tart with Pastry Cream. Happy dipping!
FAQs
Got questions about making the perfect chocolate covered strawberries? We’ve got answers!
Q1: What kind of chocolate is best for chocolate covered strawberries?
A1: You can use semi-sweet, milk, or dark chocolate chips or good quality chopped chocolate bars. The best choice is truly a matter of personal preference! For a smoother melt and professional finish, look for chocolate with cocoa butter listed as an ingredient.
Q2: Do I need to temper the chocolate?
A2: For home cooks, tempering chocolate (a process to stabilize chocolate crystals for a glossy, snap-on finish) is generally not necessary for delicious chocolate covered strawberries. Our microwave or double boiler method provides a perfectly good, easy-to-work-with melted chocolate. If you want a truly professional, shiny finish that doesn’t melt easily at room temperature, then tempering would be beneficial, but it’s an advanced technique.
Q3: Can I use frozen strawberries?
A3: No, we highly recommend using fresh strawberries. Frozen strawberries release a lot of water as they thaw, which will prevent the chocolate from adhering properly and result in a soggy berry.
Q4: Why did my chocolate seize or become thick and clumpy?
A4: Chocolate seizing is almost always due to contact with even a tiny amount of water or being overheated. Ensure all your equipment is completely dry, and melt your chocolate in short intervals, stirring frequently, to avoid overheating.
Q5: How far in advance can I make chocolate covered strawberries?
A5: While they are best enjoyed the day they are made for peak freshness and texture, you can prepare them up to 48 hours in advance. Store them in an airtight container in the refrigerator. Remember to bring them to room temperature for optimal enjoyment.